Technical Details
Tool Setting
The tool diameter can be adjusted in the following manner for standard Sh, LG, UNL and EXT series tools.
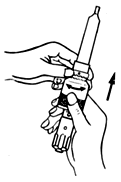
Retract the spring loaded adjusting Collar and rotate the threaded bearing Collar either on + or – side. This will alter the position of tapered mandrel (or) race in relation to the tapered rolls, thereby changing effective tool diameter to increase (+) or decrease (-) accordingly.
Now set the tool diameter to where the rolls slide snugly over the prepared surface. Similar to Plug or Ring gauging a part. Adjust the tool by rotating the bearing collar as above to 1 division marked 0.0025mm on the tool body (increase for I.D Tools and reduce for O.D Tools). Select the tool’s RPM and feed rates as per the chart. Trial-run the prepared parts and inspect the finish and size. Adjust the tool by increasing / decreasing the tool diameter by 1 or 2 divisions till the desired finish and size is achieved.

Note: The tool setting has to be proper. Over loading of the tool will result in poor surface finis on the part and reduces the tool life. Insufficient rolling pressure causes no change in the surface finish and diameter. The optimum setting of the tool diameter gives superior result in terms of surface finish, dimensional consistency and life.
How to Get Good Results
Burnishing is a Cold Rolling Process without actual removal of metal. Hence, it is important to control the pre-burnishing stock allowance and surface roughness to desired levels to obtain the best burnished surface finish. (The surface finish generally obtained for various operations are given below.)
| Surface Finish (Ra) in different machining operation | ||||||
|---|---|---|---|---|---|---|
| Operation | Burnishing | Honing | Grinding | Reaming | Boring | Turning |
| Surface Finish (Ra) | 0.05 - 0.2 | 0.1 - 0.2 | 0.2 - 0.4 | 0.4 - 0.6 | 0.8 - 1.2 | 1.5 - 2.00 |
| Diameter Change mm | 0.025 | 0.063 | 0.063 | 0.250 | 0.50 | 0.95 |
Recommended Pre-Burnishing Stock Allowance
Below is the recommended stock allowance before performing burnishing operation to get the desired result. However these values may change depending on the material grade, hardness, tool speed and feed etc. The below mentioned values can be taken as a guide.
| Pre - Burnishing Stock Allowance Chart | |
|---|---|
| DIAMETER | STOCK ALLOWANCE |
| 5 - 12 mm | 0.01 - 0.02 mm |
| 13 - 25 mm | 0.013 - 0.020 mm |
| 26 - 50 mm | 0.013 - 0.025 mm |
| 50 and above | 0.018 - 0.035 mm |
| NOTE : The parts should be de-magnetized prior to roller burnishing. | |
| Speed & Feed Chart | ||
|---|---|---|
| Tool Dia (mm) | Speed (RPM) | Tool Feed Rate (mm/rev) |
| 5-10 | 1020-4300 | 0.25-0.50 |
| 10-15 | 610-3100 | 0.45-0.90 |
| 15-20 | 500-1800 | 0.75-0.90 |
| 20-25 | 380-1500 | 0.8-1.4 |
| 25-30 | 300-1000 | 1.2-1.7 |
| 30-35 | 275-900 | 1.6-2.0 |
| 35-40 | 235-825 | 1.9-2.4 |
| 40-45 | 215-700 | 2.1-2.6 |
| 45-50 | 190-610 | 2.8-3.2 |
| 50-55 | 170-540 | 3.4-3.9 |
| 55-60 | 160-510 | 3.8-4.2 |
| 60-65 | 150-460 | 4.2-4.5 |
| 65-70 | 140-435 | 2.2-2.4 |
| 70-75 | 125-400 | 2.5-2,6 |
| 75-90 | 110-380 | 2.5-2.3 |
| 90-100 | 95-325 | 3.2-3.9 |
| 100-115 | 85-285 | 3.9-4.6 |
| 115-130 | 75-225 | 4.5-5.2 |
| 130-140 & Above | 70-210 | 5.8-5.9 |
| Trouble Shooting | ||
|---|---|---|
| PROBLEM | CAUSE | REMEDY |
| Burnishing finish not achieved | Wrong tool setting | Correct the tool setting as explained |
| Burnished bore having taper and ovality | Pre-burnishing condition not maintained | Check pre burnished part for taper and ovality and correct pre burnishing operation such as drilling, turning, reaming, boring to desired tolerances. |
| Excessive heat produced during burnishing | Inadequate flow of coolent | Use continuous flow of proper coolents |
| Poor life of Rollers | Inadequate flow of coolent Improper Speed and feed selection Incorrect burnishing allowance | Use continuous flow of proper coolents Select proper speed and feed as per chart Check pre burnishing dimension and correct pre burnishing operation to obtain desired dimension. |
| Poor surface finish after some usage of tool | Uncleaned tool Wear out of rollers | Clean the tool properly after use and oil before storage. Replace worn out rollers. |
| Breakage of cage and guide Rollers | Incorrect burnishing allowance Excess load | Check and correct burnishing allowance Set the tool as per the guide. |
| Surface Finish Chart | ||||
|---|---|---|---|---|
| Ra | R Max | Rz | N | Triangle Mark |
| 0.0013a 0.025a 0.05a 0.10a 0.20a | 0.05s -018 0.2s 0.4S O.QS | 0.05z 0.1z 0.2z 0.4z 0.8z | N1 N2 N3 N4 |     |
| 0.40a 0.80a 1.6a | 1.6S 3.2s 6.3s | 1.6z 3.2z 6.3z | N5 N6 N7 |    |
| 3.2a 6.3a | 12.58 25.0S | 12.5Z 25.0z | N8 N9 |   |
| 12.5a 25a | 50s 100s | 50z 100z | N10 N11 |   |
| 50a 100a | 200s 400s | 200z 400z | N12 | ~ |
| NOTE : Rt = Ra x 4 | ||||
